
In this article i will explain whats a "VPC", its uses and demonstrate how we can handle the networking & security using various components like VPCs, Subnets, Route tables.
Please know that i will spend little time on theory as it was better explained in AWS Documentation. We will go deep in implementing in a step-by-step manner.
We will :
1. Define AWS Components like VPC, Subnet, Route table, EC2 instance, S3.
2. Configure VPC
3. Configure Subnets
4. Setting Rout Tables
5. Creating EC2 instances in various subnets
6. Testing security we setup.
7. Talk little bit about VPC endpoints.
Let me start with a design of what we will be creating.

To put it simple VPC is a set of IP addresses you are going to isolate for launching your AWS components. A VPC spans across multiple avilability zones (AZs).
Subnets : Its a sub-division of a VPC on which you can configure network and security rules. A sub net can exists in only on avilability zone(AZ).
Route table: Each VPC and subnet will have a route table associated with it on which you will configure the routes. Means a set of IP addresses from which you can server incomming and outgoing calls over various network protocols.
EC2 - Elastic Cloud Compute: Its a AWS hosted server , may that be a windows server or a Linux server.
We will be using Linux 2.0 servers here. Not that i am expert at Linux, but we need two EC2 instances and my Free-Tier allows only 30GB of EBS to be used. Linux server can be created with 8GB EBS, where as Windows requires 30GB min. SO i can host only 1 server without spending my money.
For more info please check this link.
Before we jump on to creating stuff, you better understand difference between IPV4 and IPV6 ipaddresses and what is a CIDR blocks. Here is a LINK to study in detail. i would recommend you read this before configuring any thing else in VPC.
Select VPC with single public subnet.
I will explain why not VPC with bot public and Private subnets later.
Name the VPC and define CIDR block forVPC. I gave 10.0.0.0/16 which gives me 65531 IP address available in my vpc boundary.
 I have named my public subnet so that its easly recognizable. I defined the CIDR block for public subnet as 10.0.0.0/24 which gives me 251 IP addresses with in this subnet. Finish creating VPC.
You see two VPCs now. One deafult one and other one with name "webappvpc".

You might have seen a small configuration wizard run before confirming that VPC is created. Lets see what it does in the background.
It creates a VPC, and the public subnet we mentioned with CIDR blocks we defined. Then create a route table for both VPC and Public subnet.
Lets go to Subnets. You can see "Subnets" option on left. Now you see our public subnet created.

Make a note of 5 highlighted things here. Name of the subnet, Name of the VPC it is under, IPv4 CIDR bock, Route table name.
You can click on the "Route Table" tab right here to see the details.
 Look at 2 things here. first route "10.0.0.0/16" local means all the traffic that was generated with in VPC is allowed in this subnet. Remember "10.0.0.0/16" is the CIDR block for our VPC.
Next one "0.0.0.0/0" this means all the IPs in the world. So this is a internet gateway for all the traffic from the outside of the VPC. Since we created this subnet as public, the internet gate way will be created by default.
If you create VPC first and then public subnet seperately, you need to add the internet gateway by your self.
First whats a private subnet?
Any components we deploy in this subnet will not be accessible from outside world. They can be called only from with in the VPC.
So lets go a head and create and configure a private subnet.
AWS Console => Services => VPC => Subnets => Create Subnet
 Look at highlighted fields. Name of the private subnet, which VPC this subnet should reside under, CIDR block for this private subnet. By giving "10.0.1.0/24" we registred 251 IP addresses for this subnet.
Click on "Subnets" on left pane and you see both of our subnets. Select private subnet and click on "Route Table" tab.

Now you see there is no gate way created and the only route available is 10.0.0.0/16 , means all the traffic from wiht in the VPC is allowed into private subnet.
You see all route tables exist and the Sub nets they are associated with.
 If you want to open the subnet to a speciic set of IP range you can do it by clicking the edit routes butoton and fine tuning the CIDR block for the internet gateway.
Now we did setup vpc, subnets, route tables. time to put the configuration to test. To check it, we need two EC2 instances one in each subnet.
AWS Console => Services => EC2 => Launch Instance button click.
Select Free-Tier enabled Linux 2 AMI.

After this on screen 2 screen select t2.micro type, as its free.
Now on screen 3, we need to choose in which VPC and Subnet we want to lunch this EC2 instance.
I selected webappvpc and public subnet.

As we decided to use this as a webserver, you need to "Enable" the Auto-assign Public IP field. Leave other fields as is.
Next in screen 4 add storage (EBS) to this instance. Choose 8 GB volume, general purpose SSD.
Next Screen 5 add a tag "Name" and value being "PublicEC2Linux".
Next Screen 6: Security groups. Since i want to use this instance as a webserver, i need to add 2 more protocols both http and https by keeping CIDR clock as 0.0.0.0/0, this means outside world can make a http or a https requests to my webserver. SSH is there for Admin login for server management, which we will do in a while.
Next scren 7, review and create. Once you click "Launch" button, you will see a keypair generation screen. Select "Create a new key pair" give the name for the keypair.

You have to download keypair.pem file to access your ec2 instance, so "Launch Instance" button wont be enabled until you download .pem file. Once you download the .pem file, click launch instance and your EC2 Linux instance will be ready in a minute.
Lets create second EC2 instance, but this time lets select Private subnet. You need to perform same steps except on screen 3, 4, and 6.
In screen 3, select private subnet and change auto-assign public IP option as enabled.

Next on Screen 4, give a volumne of 10 GB just to differentiate the EC2 instances.
Continue and on Screen 6 name the security group as AppServersecuritygroup. This time as we want our app servers accessible only to our webservers, i specify the public subnet's CIDR blocks for http and https protocols. Look at the below image.

Now finish the review and on keypair selection screen choose new key pair and give a different name. I gave "PriavteEC2Keypair". Now finish creating by clicking Launch Instance button.
In a minte both the EC2 instances will be provisioned and ready for access.
If you havent done these two steps, please follow my earlier blog post and directly jump to Step 5 to check how to configure yor access credetails on Terminal
Lets access Public subnet's EC2 (First one) instance.
For this go to AWS console => Services => EC2 => Instances
Select first EC2 instance and click on connect button.
Copy the bash command hoghlighted.

Open powershell or teminal on which you should have already installed AWS CLI and configure your credentials. The .pem file should be in your downloads. so change terminal path to downloads. Run bash command you copied above.
cd .\Downloads\
ssh -i "webappvpckeypair.pem" ec2-user@ec2-35-164-182-228.us-west-2.compute.amazonaws.com
if you run above two commands and there might be a prompt to type "yes". But here it is how it should look when you connect to Linux EC2 Instance.

Now to check we did connected to first server, run below command.
lsblk
This will show all the drives and thier details. For us it should show 8 GB volume like this.

Now close the terminal/ shell.
Lets do the same thing for PrivateEc2Linux.
Go to AWS console, select PrivateEc2Linux. and click on connect button and copy bash command.
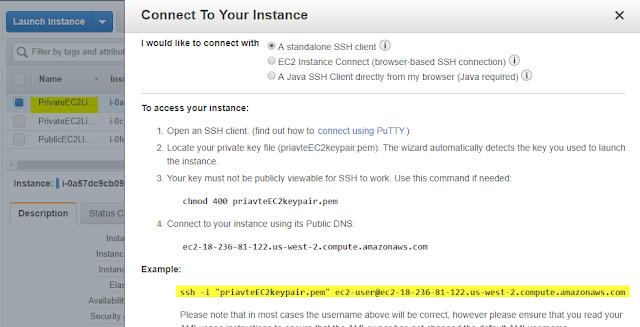
Open Terminal/Powershell and now run those 2 commands.
cd .\Downloads\
ssh -i priavteEC2keypair.pem ec2-user@ec2-18-236-81-122.us-west-2.compute.amazonaws.com
Look what we got. An error.

If you look at security group rules for "appserversecuritygroup", we did enables Admin SSH on port 22, our private subnet security settings (route table) will bock access to AppServer from outside world.
Now lets see how it can be accesses in the right way. Now scroll to very top and se the image. The access should be through webservers.
Now edit the "PriavteEC2Keypair.pem" keypair file in notepad. Copy the content.
Lets connect to WebServer (PublicEC2Linux) instance.

run "nano" command to create a file, Linux file editor will be shown where yo need to paste the content of PrivateEC2Keypair.pem file and save by pressing Ctrl+X. Give the filename as "PriavteEC2Keypair.pem"

Now if you run "ls" command to see the list of files.

The keypair file is created on Linux WebServer(PublicEC2Linux).
Now we need to run SSH command from webserver to connect to appserver(privateEC2Linux).
You may see a error saying
@@@@@@@@@@@@@@@@@@@@@@@@@@@@@@@@@@@@@@@@@@@@@@@@@@@@@@@@@@@
@ WARNING: UNPROTECTED PRIVATE KEY FILE! @
@@@@@@@@@@@@@@@@@@@@@@@@@@@@@@@@@@@@@@@@@@@@@@@@@@@@@@@@@@@
Permissions 0664 for 'priavteEC2keypair.pem' are too open.
It is required that your private key files are NOT accessible by others.
This says the privatekey file is open and accessible to everyone. So we need to put permissions on the privateEC2keypair.pem file.

Run "chmod 400 ~/priavteEC2keypair.pem" command to make the file secure.
Now run that SSH command to connect to our second EC2 instance on private subnet.

There we go. We have demonstrated how you can implement networking and security using VPCs, Subnets and Route Tables.
You have a App on Ec2 instance which is trying to upload a 100MB file to S3 bucket. Usually this call will go through internet irrespctive of geolocation/Avaliabilityzone of EC2 and S3 bucket.
Now when we create a VPCEndpoint associating S3 bucket and the Private Subnet hosting the EC2 instance, the call to upload 100MB file will not go through internet. Instead it will go through dedicated network within private subnet. Thus it is secure and definetly mutliple folds faster that earlier.
But this will be a demo for another time. If you have any questions or issues while implementing please do leave a message so that i can be of help.
Please know that i will spend little time on theory as it was better explained in AWS Documentation. We will go deep in implementing in a step-by-step manner.
We will :
1. Define AWS Components like VPC, Subnet, Route table, EC2 instance, S3.
2. Configure VPC
3. Configure Subnets
4. Setting Rout Tables
5. Creating EC2 instances in various subnets
6. Testing security we setup.
7. Talk little bit about VPC endpoints.
Let me start with a design of what we will be creating.

1. Definitions
VPC - Virtual Private Cloud : Its a logical isolation of AWS cloud where you can launch your AWS components. You can completely control the security with in a VPC using subnets and route tables.To put it simple VPC is a set of IP addresses you are going to isolate for launching your AWS components. A VPC spans across multiple avilability zones (AZs).
Subnets : Its a sub-division of a VPC on which you can configure network and security rules. A sub net can exists in only on avilability zone(AZ).
Route table: Each VPC and subnet will have a route table associated with it on which you will configure the routes. Means a set of IP addresses from which you can server incomming and outgoing calls over various network protocols.
EC2 - Elastic Cloud Compute: Its a AWS hosted server , may that be a windows server or a Linux server.
We will be using Linux 2.0 servers here. Not that i am expert at Linux, but we need two EC2 instances and my Free-Tier allows only 30GB of EBS to be used. Linux server can be created with 8GB EBS, where as Windows requires 30GB min. SO i can host only 1 server without spending my money.
For more info please check this link.
Before we jump on to creating stuff, you better understand difference between IPV4 and IPV6 ipaddresses and what is a CIDR blocks. Here is a LINK to study in detail. i would recommend you read this before configuring any thing else in VPC.
2. Configure VPC
Go to AWS console => Services => VPC => Launch VPC WizardSelect VPC with single public subnet.
I will explain why not VPC with bot public and Private subnets later.
Name the VPC and define CIDR block forVPC. I gave 10.0.0.0/16 which gives me 65531 IP address available in my vpc boundary.

You see two VPCs now. One deafult one and other one with name "webappvpc".

You might have seen a small configuration wizard run before confirming that VPC is created. Lets see what it does in the background.
It creates a VPC, and the public subnet we mentioned with CIDR blocks we defined. Then create a route table for both VPC and Public subnet.
Lets go to Subnets. You can see "Subnets" option on left. Now you see our public subnet created.

Make a note of 5 highlighted things here. Name of the subnet, Name of the VPC it is under, IPv4 CIDR bock, Route table name.
You can click on the "Route Table" tab right here to see the details.

Next one "0.0.0.0/0" this means all the IPs in the world. So this is a internet gateway for all the traffic from the outside of the VPC. Since we created this subnet as public, the internet gate way will be created by default.
If you create VPC first and then public subnet seperately, you need to add the internet gateway by your self.
3. Create Subnet
We already created public subnet as part of creating VPC. Now lets create a private subnet and compare it with public subnet to find differences.First whats a private subnet?
Any components we deploy in this subnet will not be accessible from outside world. They can be called only from with in the VPC.
So lets go a head and create and configure a private subnet.
AWS Console => Services => VPC => Subnets => Create Subnet

Click on "Subnets" on left pane and you see both of our subnets. Select private subnet and click on "Route Table" tab.

Now you see there is no gate way created and the only route available is 10.0.0.0/16 , means all the traffic from wiht in the VPC is allowed into private subnet.
4. Setting Rout Tables
Click on Services => VPC => Route TablesYou see all route tables exist and the Sub nets they are associated with.

Now we did setup vpc, subnets, route tables. time to put the configuration to test. To check it, we need two EC2 instances one in each subnet.
5. Creating EC2 instances in various subnets
First lets create a EC2 instance on public subnet. let me show you how.AWS Console => Services => EC2 => Launch Instance button click.
Select Free-Tier enabled Linux 2 AMI.

After this on screen 2 screen select t2.micro type, as its free.
Now on screen 3, we need to choose in which VPC and Subnet we want to lunch this EC2 instance.
I selected webappvpc and public subnet.

As we decided to use this as a webserver, you need to "Enable" the Auto-assign Public IP field. Leave other fields as is.
Next in screen 4 add storage (EBS) to this instance. Choose 8 GB volume, general purpose SSD.
Next Screen 5 add a tag "Name" and value being "PublicEC2Linux".
Next Screen 6: Security groups. Since i want to use this instance as a webserver, i need to add 2 more protocols both http and https by keeping CIDR clock as 0.0.0.0/0, this means outside world can make a http or a https requests to my webserver. SSH is there for Admin login for server management, which we will do in a while.
Next scren 7, review and create. Once you click "Launch" button, you will see a keypair generation screen. Select "Create a new key pair" give the name for the keypair.

You have to download keypair.pem file to access your ec2 instance, so "Launch Instance" button wont be enabled until you download .pem file. Once you download the .pem file, click launch instance and your EC2 Linux instance will be ready in a minute.
Lets create second EC2 instance, but this time lets select Private subnet. You need to perform same steps except on screen 3, 4, and 6.
In screen 3, select private subnet and change auto-assign public IP option as enabled.

Next on Screen 4, give a volumne of 10 GB just to differentiate the EC2 instances.
Continue and on Screen 6 name the security group as AppServersecuritygroup. This time as we want our app servers accessible only to our webservers, i specify the public subnet's CIDR blocks for http and https protocols. Look at the below image.

Now finish the review and on keypair selection screen choose new key pair and give a different name. I gave "PriavteEC2Keypair". Now finish creating by clicking Launch Instance button.
In a minte both the EC2 instances will be provisioned and ready for access.
6. Testing security we setup
Unlike windows , Linux has no GUI, so you can access Linux servers by using bash commands and through terminal/command prompt/powershell. For this you might already have installed AWSCLI and configure your credentials in terminal.If you havent done these two steps, please follow my earlier blog post and directly jump to Step 5 to check how to configure yor access credetails on Terminal
Lets access Public subnet's EC2 (First one) instance.
For this go to AWS console => Services => EC2 => Instances
Select first EC2 instance and click on connect button.
Copy the bash command hoghlighted.

Open powershell or teminal on which you should have already installed AWS CLI and configure your credentials. The .pem file should be in your downloads. so change terminal path to downloads. Run bash command you copied above.
cd .\Downloads\
ssh -i "webappvpckeypair.pem" ec2-user@ec2-35-164-182-228.us-west-2.compute.amazonaws.com
if you run above two commands and there might be a prompt to type "yes". But here it is how it should look when you connect to Linux EC2 Instance.

Now to check we did connected to first server, run below command.
lsblk
This will show all the drives and thier details. For us it should show 8 GB volume like this.

Now close the terminal/ shell.
Lets do the same thing for PrivateEc2Linux.
Go to AWS console, select PrivateEc2Linux. and click on connect button and copy bash command.

Open Terminal/Powershell and now run those 2 commands.
cd .\Downloads\
ssh -i priavteEC2keypair.pem ec2-user@ec2-18-236-81-122.us-west-2.compute.amazonaws.com
Look what we got. An error.

Now lets see how it can be accesses in the right way. Now scroll to very top and se the image. The access should be through webservers.
Now edit the "PriavteEC2Keypair.pem" keypair file in notepad. Copy the content.
Lets connect to WebServer (PublicEC2Linux) instance.

run "nano" command to create a file, Linux file editor will be shown where yo need to paste the content of PrivateEC2Keypair.pem file and save by pressing Ctrl+X. Give the filename as "PriavteEC2Keypair.pem"

Now if you run "ls" command to see the list of files.

The keypair file is created on Linux WebServer(PublicEC2Linux).
Now we need to run SSH command from webserver to connect to appserver(privateEC2Linux).
You may see a error saying
@@@@@@@@@@@@@@@@@@@@@@@@@@@@@@@@@@@@@@@@@@@@@@@@@@@@@@@@@@@
@ WARNING: UNPROTECTED PRIVATE KEY FILE! @
@@@@@@@@@@@@@@@@@@@@@@@@@@@@@@@@@@@@@@@@@@@@@@@@@@@@@@@@@@@
Permissions 0664 for 'priavteEC2keypair.pem' are too open.
It is required that your private key files are NOT accessible by others.
This says the privatekey file is open and accessible to everyone. So we need to put permissions on the privateEC2keypair.pem file.

Run "chmod 400 ~/priavteEC2keypair.pem" command to make the file secure.
Now run that SSH command to connect to our second EC2 instance on private subnet.

There we go. We have demonstrated how you can implement networking and security using VPCs, Subnets and Route Tables.
7. Talk little bit about VPC endpoints.
Apart from security there is another important use we need to discuss here. Use of Private Subnets for better performance. Lets take a scenario.You have a App on Ec2 instance which is trying to upload a 100MB file to S3 bucket. Usually this call will go through internet irrespctive of geolocation/Avaliabilityzone of EC2 and S3 bucket.
Now when we create a VPCEndpoint associating S3 bucket and the Private Subnet hosting the EC2 instance, the call to upload 100MB file will not go through internet. Instead it will go through dedicated network within private subnet. Thus it is secure and definetly mutliple folds faster that earlier.
But this will be a demo for another time. If you have any questions or issues while implementing please do leave a message so that i can be of help.
No comments:
Post a Comment