
In Azure DevOps, "self-hosted agents" refer to agent machines that you set up and manage yourself, instead of using Microsoft-hosted agents. These self-hosted agents can be beneficial in various scenarios:
Security and Compliance: In some organizations, data security and compliance policies may require running build and deployment processes on infrastructure managed within their own network.
Access to Internal Resources: Your build and deployment processes may require access to internal resources (databases, network drives, etc.) that are not accessible from external Microsoft-hosted agents.
Performance and Customization: Self-hosted agents can be tailored to specific hardware configurations, which might be necessary for resource-intensive builds or specialized build environments.
Cost Management: Azure DevOps provides a certain number of free Microsoft-hosted parallel jobs, but if you have large-scale or resource-intensive projects, self-hosted agents can be more cost-effective in the long run.
Reducing Build Queue Times: When using Microsoft-hosted agents, you share resources with other users, which might result in longer build queue times. Self-hosted agents allow you to control the resources dedicated to your builds, potentially reducing waiting times.
Offline Environments: If you have environments without continuous internet access, self-hosted agents can be used to facilitate builds and deployments within those isolated networks.
In this post i will be:
- Generating a Managed VM Image using Packer.
- Saving the Managed image to a Image gallery within my tenant.
- Create a Virtual Machine Scale Set(VMSS) from the said image.
- Register the VMSS as DevOps Self-Hosted agents.
- Run a time intensive project using self-hosted pool to see how VMSS will autoscale.
- Then update the VM image with new build and see how we can update the existing Self-hosted agents.

Step 1: Download the code from SelfHosted-Devops-Agent-TF-and-Packer
Please know that the Linux custom Packer Image definition is not part of this repo. but dont worry, it will download all the required packer file and necessary installer scripts and packages automatically when you run the pipeline.
Below image will explain the contents of the repo.

Step 2: Update the Suscription id in the Setup.azcli script and run it. The script will give a final out put where you need to create DevOps library variable group based on the output values. More details are there in Readme file. Please fillow the variable names defined in readme file and the values can be found from out put of above setup script.


Step 4: Now create a pipeline and point it to "buildagent-generation-template.yml" and run it.
Please know that i have used only a subset of packages from ones listed in this file LINK


to this


If you look into the yaml file , you can see this repo is fecting the packer file and image dependecies from https://github.com/actions/runner-images.git
Ususally this subet takes 45 mins to finish. If you want to build VM with full list of installer artifacts, try using "buildagent-generation-template-full.yml" instead. This will take 1.5 hours to finish creating VMSS.
Now try running the pipeline, and you will see below prompts.

Step 5: Now run it for creating a VMSS and then for Updating existing VMSS based on your packer image build.
Please note that, in this process a temporary resource group will be created with the build number and a VM with Public IP will be created. Now the Packer will download all the installer artifacts and install them and build the VM to gold standard. Now the .vhd file will be generated and saved to the storage account. Once this process is sucessfully finished, the temporary resource group will be deleted with all the content of it. This is the part reason why we gave SPN contributir access at subscription.

The resource group hosting VMSS will host other componenets required for VMSS, like a load balancer, a VNET public IP for load balancer and VMSS.

Step7: Now its time to see the VMSS in action. to do that go to DevOps organization settings and navigate to "Agent Pools".
Create a new agent pool and select the pool type as VMSS and authorize the Subscription and select the VMSS we created earlier. In settings i configured to have only 1 instance to be on standby and in case of any new jobs kicked in, the maximum number of instances to be 5. I also configured to shred the extra idle instances after 5 mins. In prod, this will be like 30 mins.

Now you will see the VMSS instances in the list of agents. If you couldnt, go to VMSS instances and select the instances and click upgrade. This will automatically run the required bash commands to make these VMSS instances avialable as agents.

Now you can see that as per our configuration there will be only one devops agent instance of VMSS available on standby mode.

Now we need to put some stress on it to see how it goes.
Step8: Create a dummy project and add a test yaml as shown below.
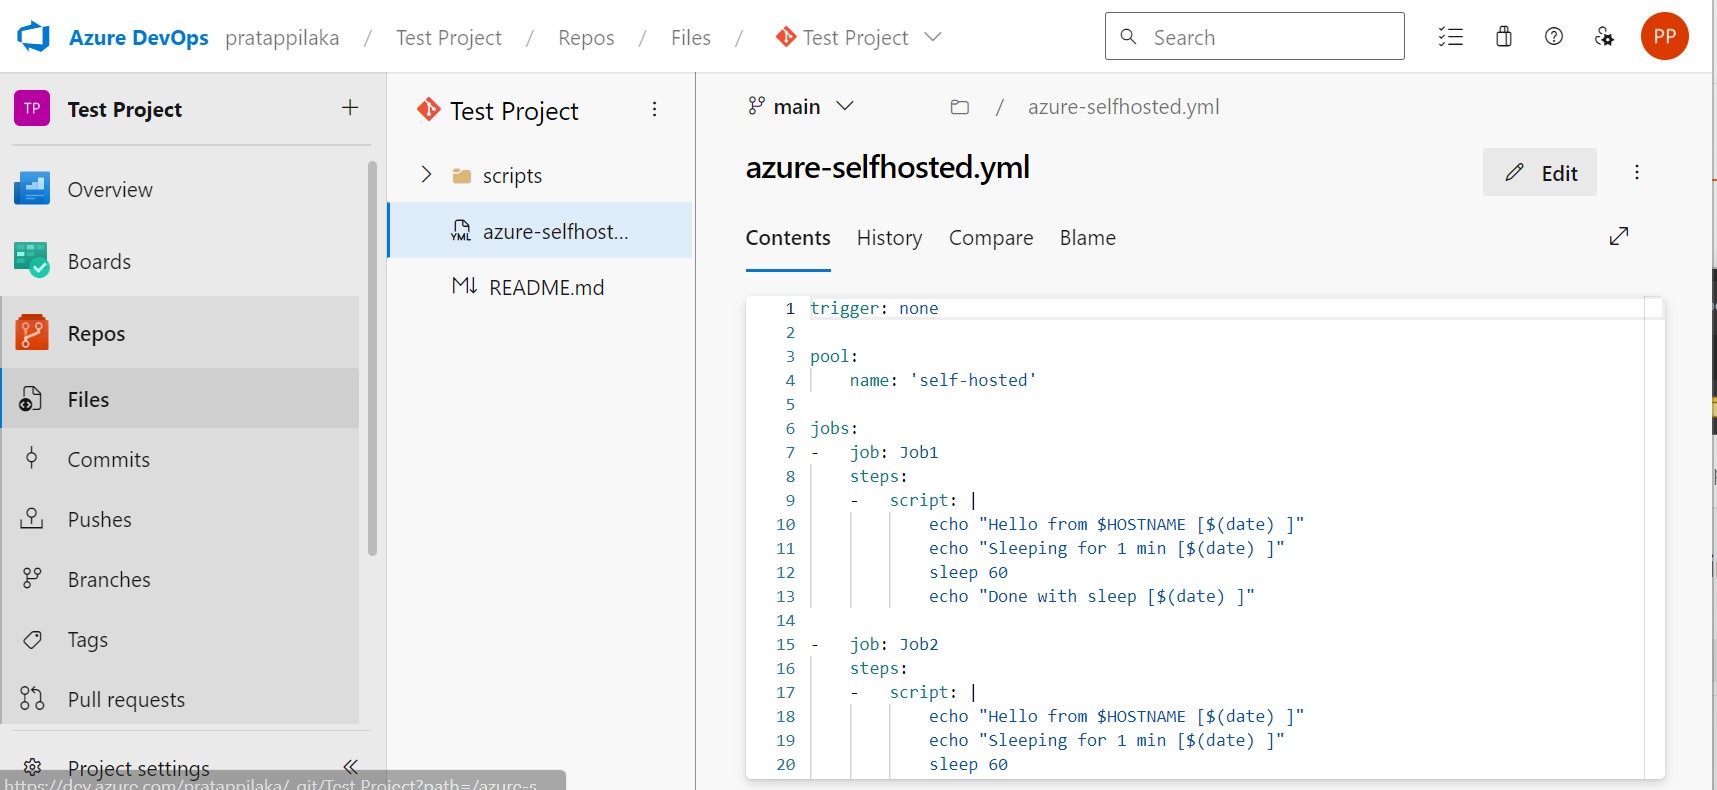
Just create duplicate Jobs with different job names.
trigger: none
pool:
name: 'self-hosted'
jobs:
- job: Job1
steps:
- script: |
echo "Hello from $HOSTNAME [$(date) ]"
echo "Sleeping for 1 min [$(date) ]"
sleep 60
echo "Done with sleep [$(date) ]"
- job: Job2
steps:
- script: |
echo "Hello from $HOSTNAME [$(date) ]"
echo "Sleeping for 1 min [$(date) ]"
sleep 60
echo "Done with sleep [$(date) ]"
Now if you look carefully at the pieline, the pool: parameter usually have a image:ubuntu-latest. In this case we want to run this pipeline on the self-hosted agent pool we created earlier. so you need to chnage as shown above. Run this pipeline to see our self-hosted agent pool in action.
Step 9: I created the test pipeline with 9 jobs which print what self-hosting agent it is running from and wait for a min and then print a message done sleeping with time stamps.
I started the dummy pieline.

Now if you look at the VMSS instances , it will change from


as soon as the instances were sucessfully provisioned, the number of jobs stated paralelly will also increase based on dependecies.

and you can also se the number of agents created in our self-hosted agent pool.

Step 10: Now lets say you have decided to update the artifacts that will be installed on gold image. For this you have updated the packer file and now all you need to do is, run this pipeline by selecting "update vmss" option.

If you look into the yaml file , you can see this repo is fecting the packer file and image dependecies from https://github.com/actions/runner-images.git
This is the MicroSoft git for runner images. But this is full set and will take 1.5 hours to build the VM image. Instead i made a packer file with subset of installer artifacts and hosted it at https://github.com/pratappilaka24/custom-image.git
This will only take 35 minutes to build VM and 45 mints to finish end to end deployment of VMSS.
Hope this helps and do let me know in case of any help needed.
No comments:
Post a Comment