
Decorator Pattern can be defined best by below Image.

Definition:
Attach additional responsibilities to an object dynamically. Decorators provide a flexible alternative to sub-classing for extending functionality.
UML:

Look at the kids photo on the top. All the three images were same except there are some additional decorations added to the original images in both second and third images.
Lets start creating the similar application(console for simplicity) which can do the same thing.
Objective: To create a application in which user can edit the different components like Brightness, Contrast, and Hue of a selected picture. Up on which different themes can be applied with out changing the base class infrastructure.
Step 1: Create a console application (for ease of understanding) with name "DecoratorSample".
Step 2: Create a abstract class "AbstractEditingComponent", to accommodate initial properties.
namespace DecoratorSample
{
    public abstract class AbstractEditingComponent
    {
        private string _imagename;
        private int _brightness;
        private int _contrast;
        private int _hue;

        public int Brightness { get {return _brightness;} set {_brightness=value;} }

        public int Contrast { get{return _contrast;} set {_contrast=value;} }

        public int Hue { get{return _hue;} set {_hue=value;}}

        public string ImageName { get{return _imagename;} set {_imagename=value;} }

        public abstract void DisplayOutput();
    }
}
Step 3: A ConcreteEditor is defined with concrete implementation of DisplayOutput method.namespace DecoratorSample
{
public class ConcreteEditor:AbstractEditingComponent
{
public ConcreteEditor(string imageName,int brightness, int contrast, int hue)
{
ImageName = imageName;
Brightness = brightness;
Contrast = contrast;
Hue = hue;
}
public override void DisplayOutput()
{
Console.WriteLine("(\"Concrete Editor\") ImageName :" +ImageName);
Console.WriteLine("(\"Concrete Editor\") Adjusted Components : Brightness : " + Brightness + " Contrast : " + Contrast + " Hue: " + Hue);
}
}
}
Now, we have class infrastructure required to modify the attributes of an Image.Step 4: Now we need to provide additional functionality so that user can apply what ever themes he want, and this should happen with out effecting the existing class infrastructure.
For that i create a AbstractDecorator class inheriting the AbstractEditingComponent.
namespace DecoratorSample
{
    public abstract class AbstractDecorator : AbstractEditingComponent
    {
        protected AbstractEditingComponent _editingComponent;

        public AbstractDecorator(AbstractEditingComponent editingComponent)
        {
            _editingComponent = editingComponent;
        }
        public override void DisplayOutput()
        {
            _editingComponent.DisplayOutput();
        }
    }
}
Step 5: We are providing 2 different themes to users. "Christmas" and "Halloween".Step 6: Now create the program to demonstrate how a ConcreteEditor object is created and how the additional decoration is attached to that object.//Christmas Decorator namespace DecoratorSample { public class ChristmasDecorator:AbstractDecorator { public ChristmasDecorator(AbstractEditingComponent editingComponent):base(editingComponent) { } public override void DisplayOutput() { _editingComponent.DisplayOutput(); ApplyChristamasTheme(); } public void ApplyChristamasTheme() { Console.WriteLine("(\"Christmas Decorator\") Applied Christmas Theme to Image : " + _editingComponent.ImageName); } } }//Halloween Decorator namespace DecoratorSample { public class HalloweenDecorator : AbstractDecorator { public HalloweenDecorator(AbstractEditingComponent editingComponent):base(editingComponent) { } public override void DisplayOutput() { _editingComponent.DisplayOutput(); ApplyHalloweenTheme(); } public void ApplyHalloweenTheme() { Console.WriteLine("(\"Halloween Decorator\")Applied Halloween Theme to Image : " + _editingComponent.ImageName); } } }
namespace DecoratorSample
{
class Program
{
static void Main(string[] args)
{
//Creating first ConcreteEditor instance. //Decorating it with Christmas theme using Christmas Decorator. //Creating second ConcreteEditor instance. //Decorating it with Halloween theme using Christmas Decorator.
Output :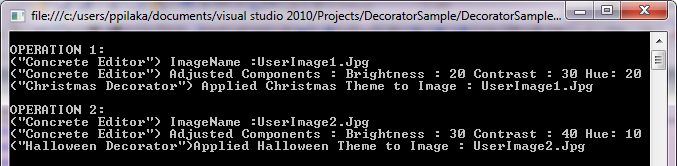
Code:
Click Here
Is it helpful for you? Kindly let me know your comments / Questions.
thx nice post
ReplyDeleteVery nice explanation and example.... :)
ReplyDeleteThanks Prashant . . .
Delete